![]()
![]()
|
|
|
|
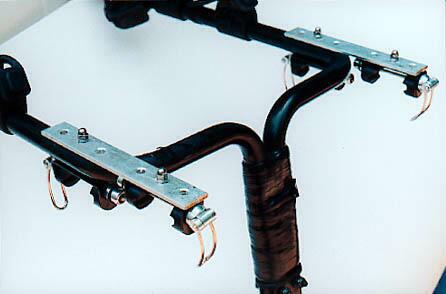
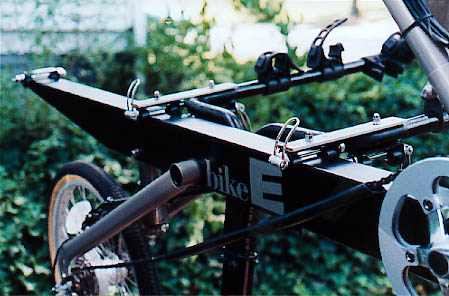
Necessity is the Mother of Invention
Here are photos of modifications that I’ve made to my Thule hitch mount rack so it will now accept our BikeE recumbents in style, along with a conventional bikes. These photographs were taken when we had only two BikeE's and since making these photographs, I’ve added another set of clamps for our 3rd BikeE... the bikes are taking over!<s> Also, the photographs were made before I painted the exposed metal with black paint, so the detail of the mounting is more readily visible. A matter of balanceThen I got my first BikeE, I had mounted some right angle brackets above the tubes where my BikeE rigid frame used to sit. However, when I got the AirTech, the suspension and rear supports did not lend itself to sliding over the tubes, as it was very off balance. Also, when the two BikeEs were put on the rack, there was barely any room for my sons’ wedgies.So, I did a little re-engineering. It hangs just fine!The technique involved mounting BikeE accessory brackets to the underside of the horizontal tubes on the rack. The epiphany came when I realized that I could mount one bike on the car side of the vertical bar, and one bike on the far side of the vertical bar, leaving more room for the conventional bikes, and improving the balance or the rack. The fabricationI used some pieces of zinc or galvanized “mending plate” available at hardware stores. As luck would have it, the holes that come on the plate are centered (don’t use the one with offset holes) and perfectly spaced for the slots on the accessory mounts. I used 10-24 stainless steel bolts to connect the brackets to the mending plate, and drilled holes through the horizontal tubes where applicable. Because I wanted to use the countersunk holes in the mending plate, I had to disassemble the brackets and fasten them to the rig with the nut close to the plastic rail grippers. To be very certain of its strength, I then drilled up through the center of the bracket and added a center round head bolt, this time with a nut and cap on the top of the rack. So each bracket gets three screws. I used a dremel cut-off disk to cut the excess threads so the rail grippers could be reinstalled. So, two of the brackets are attached directly to the mending plate, and two are attached to the underside of the rack (the latter two holding the mending plate onto the rack). I used some foam pipe insulation wrapped in black electrical tape to pad the last few inches of the vertical tube of the rack... both to cushion the BikeE from rubbing, and to protect my lift up door on my SUV when the bikes are not present. The Zenreich ManeuverTo mount the bikes, I take the air tech and lift it into place, with the wheels tipped towards the back of the car, insert the leading edge of the rail into the clips and leverage the wheels downward until it pops into place. The second bike does much the same... each bike leveraging towards the upright. When I mount the second bike, I mount it off center (off to the right) so that the handlebars don’t bang into the first bike during the leveraging... as soon as it’s in the track, I can slide the bike back towards center. I then tighten up all the bracket clamps... For very long trips, I usually add a couple of web straps with fastek clips (from a local camping store) around the two bikes as a fail safe. I’ve been playing with the pedal placement, they snuggle beautifully above the rear tires and the underside of the frame of the opposing bike. If I turn the front wheels and handlebar 180 degrees, the wheels snuggle in just inside the kickstand space of the opposing bike. I hope you enjoy the “Zenreich Maneuver”, as I’m calling the leveraging of the bikes into the clips <s>
Copyright © 1999 by Zenreich Systems. All rights reserved. |
|
All text and photographs copyright © 1999 - 2017 Zenreich Systems. All rights reserved. |